Jobs prepped for us, or on final grade, get priority service and cost less.
You can do the prep yourself. See the photo gallery below for examples that suit your situation.
For reshaping or prepping existing bed areas to be curbed:
- Mark your line by laying out your garden hose. If you want, paint the line with upside down paint marker. Be sure its not too wiggly!

- Pull out plastic/ remove existing edging
- You can use a half moon edger ( be sure it has been sharpened- for some reason, they are sold without a sharp edge making them almost useless until they are sharpened. ) Cut a vertical cut about 1-2″ into the lawn from where the curb will actually be. ( our machine needs a little extra space ) do this by keeping your foot on the edger and pushing with your foot, then pulling back up with your hand- you can go very quickly this way. Then get under the turf only about 1 to 1.5″ deep with the edger. It helps if a second person pulls up ( watch those fingers!) while you keep cutting horizontally under the sod thatch. This method works well for expanding existing edges after the plastic is pulled out.
- If you are preparing bigger beds, renting a sod cutter is a good way to go. Home Depot has them, and most rental companies do too. The Billy Goat is a very easy to use sod cutter for smaller areas. The Klassen or Bluebird are better for big areas on open ground but are harder to steer. It helps if the lawn is thoroughly watered the day before sod cutting- as those blades cut damp roots and soil better than hard grisly dry roots!
- For new beds you can install landscape fabric up to about 4″ from your prepped line, leaving the soil exposed in those 4″ ( we want the curb ideally to lay half on the soil, half on the fabric.) Hold the fabric done with nails or the tacks sold for that purpose.
- You can install the rock or mulch in the bed if there is room. Just keep it back from the lawn edge about 18″ and piled up a bit so we have room to maneuver the extruder.
- Call us to install the curb (we try to do prepped jobs within week of getting the order)
- A day or two after the curb is installed, you can pull the rocks up against the back side of the curb, and the bed is done! For new beds you can install landscape fabric up to about 4″ from your prepped line, leaving the soil exposed in those 4″ ( we want the curb ideally to lay half on the soil, half on the fabric.) Hold the fabric down with nails or the tacks sold for that purpose. You can install the rock or mulch in the bed. Just keep it back from the lawn edge about 18″ and piled up a bit so we have room to maneuver the extruder. A day or two after the curb is installed, you can pull the rocks up against the back side of the curb, and the bed is done!
-
Below is a description of the
Kill and Cover prep method used for large new bed areas:Extruding Concrete “Kill and Cover”- a shortcut for creating new beds in an area with lawn
This is a method used for creating larger new beds in an existing lawn. It saves all the tedious work and EXPENSE of cutting out big areas of sod and hauling all that material away only to fill up the space with rock or mulch anyway. The old turf left underneath won’t hurt anything.
1) Use your hose to lay out the line.
2) Cut just one swath with the half moon edger or with a sod cutter.
3) Spray all the grass behind the curb with “Roundup” to kill the lawn. Click HERE for a link on the pragmatic use of roundup in your yard or HERE for an article on theoretical and potential dangers of roundup and click HERE for alternatives to roundup
4) Plant your shrubs
5) Install fabric
6) Install rocks/ mulch, keeping it back 18″ from the prepped line
7) Call us to come by and install the curb.
8) Finish as needed
Gallery:

This is way Too deep! The number 1 rule: NOT TOO DEEP!!!

Knife! sure, peel back the sod with a knife not too deep! 1.5" max

a flat spade works too! 1.5" deep max. Keep depth uniform all along curb- no pits or big differences in depth.

this lee valley tool is a nice one to have! sharpen it well.

Half moon edger- the ultimate $20 weapon for prep. For some reason they are sold DULL without an edge. Use a grinder to get a really sharp edge.

half moon edger SHARPEN IT!

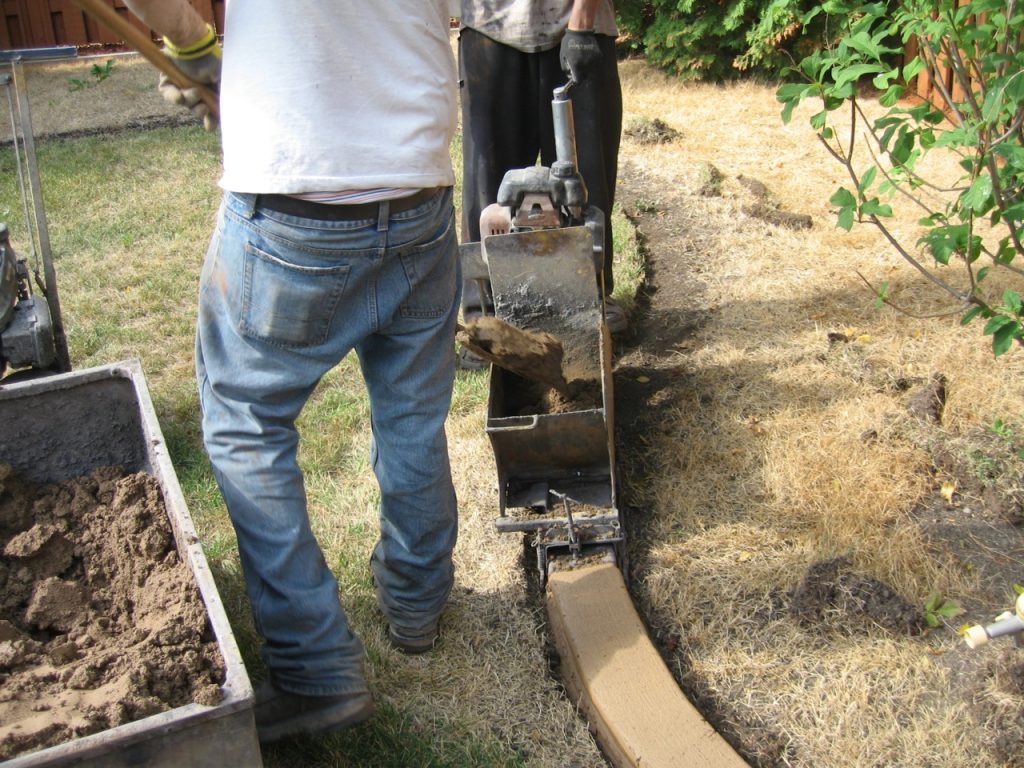
the ryan jr is a very good machine

This is the Billy Goat sod Cutter its our main go-to for trimming around beds. You can run that blade through smaller rocks if you want

Klassen Sod-Cutter available to rent at Home depot- a bit bulky for most yards

Blue Bird Sod-Cutter available to rent - too heavy and not very maneuverable

Our own custom built sod cutter- light and maneuverable

Good customer prep that inside curve near the top might be a bit sharp

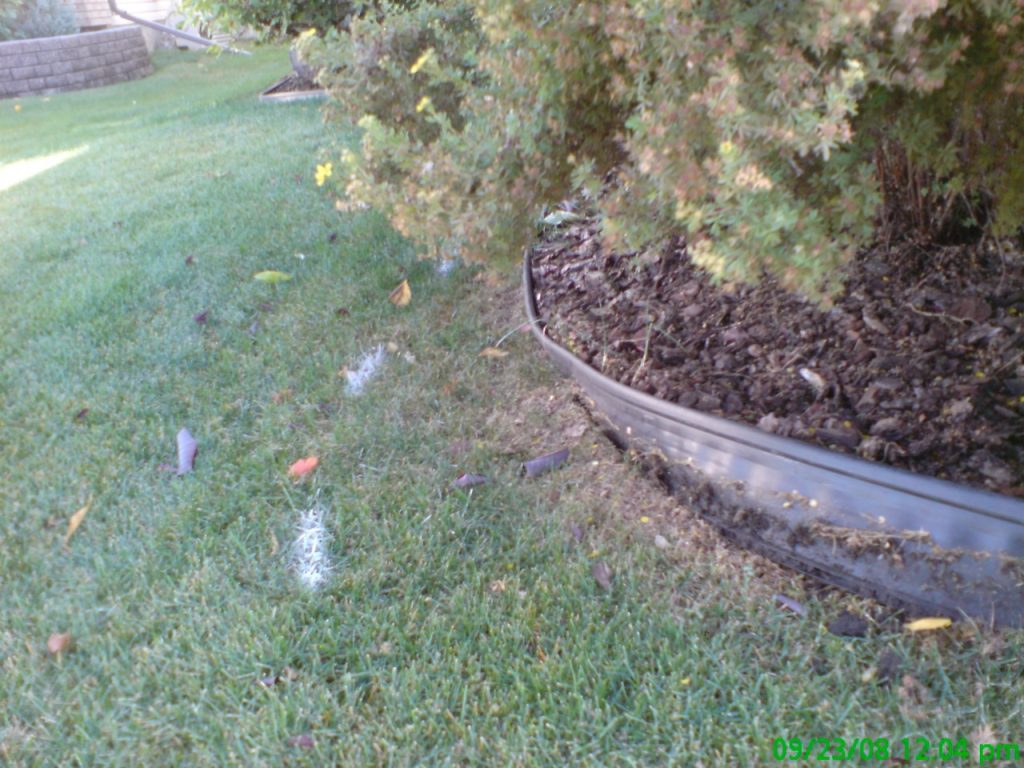
Customer prep is left too ragged for good curb installation- line is undefined, no clean vertical edge next to the lawn. We had to pull back the fabric to fix this. Otherwise pretty good! See that bit of live grass showing? Its just fine. It will die.

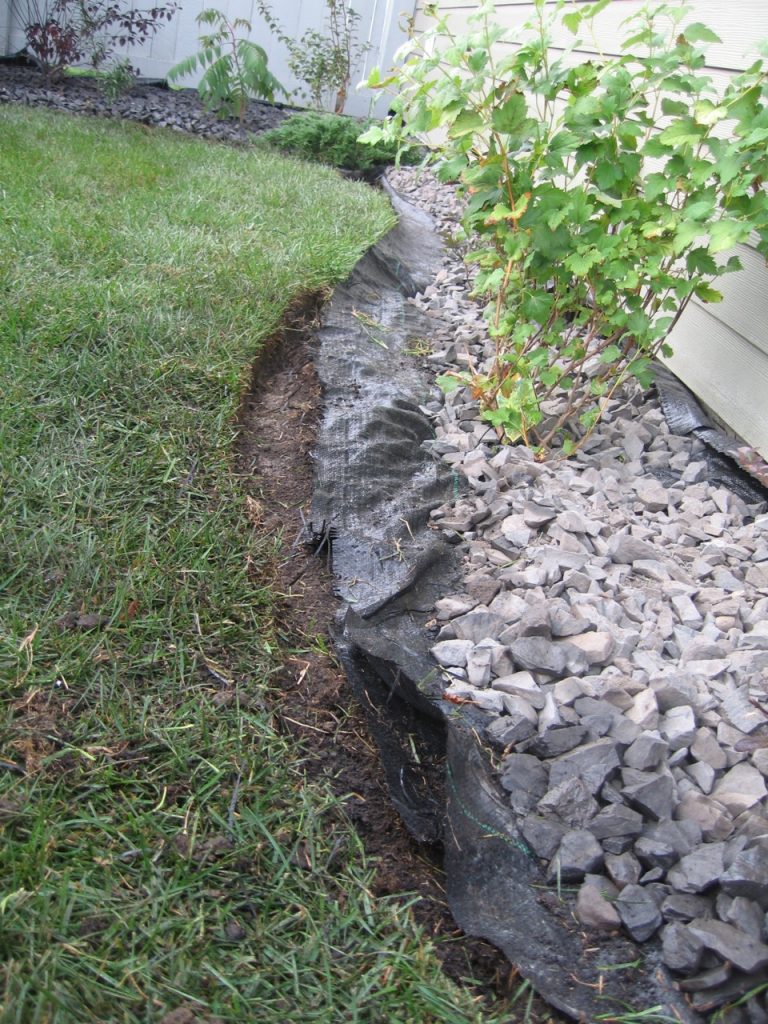
we cleaned up the rough edge and installed this curb

existing bed nicely re-shaped. this is nice prep work done for us by homeowner.

using half-moon edger to cut the turf along the line.Keep your foot on it as you go. Lift with your hands, shift, push with your foot- repeat...

Good. Rocks or nails keep fabric from blowing around before we get there.

Fabric can be left ragged and trimmed later- but its best to trim it neatly and we go 50/50 on the edge of fabric.Especially with "slippery" fabric.

perfectly raked and marked. A scratched line will do .For us, the marked Line is for the front edge of curb where it meets the grass.

perfectly raked/marked topsoil. ready to go for curb

We are reshaping this a bit more now that we can see what it needs.

this shallow depth is fine for new lawn. deeper on older lawns is fine, because thatch is established.

homeowner just cut along line with knife and peeled this fairly new lawn. Easy for about a year after new sod is laid.

homowner pulled out plastic , pushed back rock and reshaped it. Very good!

fabric left like that is OK. But if the stuff is too thin/cheap, it will snag and tear.

Very good homeowner prep, fabric could have been kept in 4" from the turf edge. that would be ideal so the curb sits 50/50 on soil.

Kill and cover- lawn behind will be covered with fabric and rock. no need to peel it all up!see Kill and cover

Ground prep - 02

good prep. fabric is better if kept back 4" from edge

good prep. fabric is better if kept back 4" from edge